Tuesday, July 21, 2009

Thai Peanut Noodles with Roasted Cauliflower and Broc


I've never been a fan of cauliflower. I always thought is was bland and boring.I tend to simply ignore it.
UNTIL I roasted it. Can you tell I have a thing for roasting vegetables? It's easy. You basically ignore them while they roast, and you can start washing prep dishes or make a salad. The flavor seems so deep while they're still nutrient-rich. Just ask Martha! They also soften up enough so a one-year old without molars can easily chew them. This is one of my newest and favorite quick meals. Definitely less than 40 minutes, and it will be on the table. Most of that time is just waiting for noodles and vegetables to cook.

INGREDIENTS:
6-8 cups cauliflower and broccoli florets (about 3 small to medium heads)
1 lb whole wheat spaghetti (or udon or soba noodles)
1/2 to 3/4 cup your favorite Thai-peanut sauce*
about 6 leaves of fresh basil, chopped for garnish (or handful of chopped cilantro or parsley)
sesame seeds for garnish
olive oil for drizzling
salt and pepper to taste

Preheat oven to 400 degrees. Place cauliflower and broccoli florets in a 9x13 baking dish. Spread out in a single layer. Drizzle with 2-3 Tablespoons of olive oil to evenly coat. Sprinkle with salt and pepper. Roast for 20-25 minutes until lightly browned. Meanwhile, bring large pot of water to a boil. Cook noodles for 10 minutes. I like using metal tongs to stir the noodles, so they don't stick together. They're also a great tool for tossing and mixing all the ingredients for this recipe. Prep the peanut sauce while veggies are roasting and noodles are boiling. Reserve ½ cup of the pasta cooking water to think out peanut sauce (see note below.) Once noodles, sauce and veggies are done toss all together. Garnish with basil and sesame seeds. Serve with lightly-steamed green beans tossed with sesame oil and tamari on the side.

*This recipe is pretty close, but reduce the ingredients by half. For a pound of noodles, I've found 1/2 to 3/4 cup (including water to thin it out) of peanut sauce is enough. I used Ken Haedrich's recipe in his Feeding the Healthy Vegetarian Family. I add about 1/3 cup of the pasta's hot boiling water to thin it out, so it is easier for the kids to eat and much easier to distribute all over the noodles.

Sunday, July 19, 2009

Pesto Pasta with Collard Greens and Roasted Summer Squash


This was our quick dinner post-CSA pick-up on Thursday night. Really simple and again only takes about the time it takes to cook the pasta. I often don't have the patience it takes to cook the collard greens long enough to get them to a consistency that my 12 month-old can chew and swallow, but this turned out perfect. Plus, roasted summer squash is amazing!

INGREDIENTS:
1 lb pasta (whole wheat penne is often our choice - easy for little fingers to pick up)
1 or 2 summer squash, washed and cut into bite-size pieces
one bunch (about 5 leaves) collard greens, rinsed and cut into ribbons*
handful walnuts
two garlic cloves
two big handfuls of fresh basil (and/or parsley)
1/2 to 1 teaspoon of salt, to taste
couple twists of fresh ground pepper
1/8 to 1/4 cup of olive oil

Bring large pot of water to a boil, and then add pasta and cook for about 10 minutes. Add greens to boiling water when 8 minutes of cooking time remains. Meanwhile, preheat oven to 400. Place squash in a baking dish. Lightly drizzle with oil and salt and pepper to taste. Roast at 400 for about 20 minutes, until tender. Turning once halfway through roasting. Place remaining ingredients (except olive oil) in a food processor. Immediately drizzle oil into processor while it purees. Stop adding oil until you reach your preferred consistency. I like to add about 1/4 cup of the pasta's cooking water to stretch the pesto out a bit and make it smoother for the babes. When all is done cooking, lightly toss pasta and greens with the pesto and roasted squash. Serve immediately. You just may have leftovers for tomorrow's lunch, but don't count on it if you're as hungry as we are at the end of the day. Add an easy salad to the side to slow yourself down from shoveling the pasta in your face.

*I pull the greens off the vein and then pile them on top of each other. I then roll them like a tight burrito and then cut down the roll to create ribbons.

Wednesday, July 15, 2009

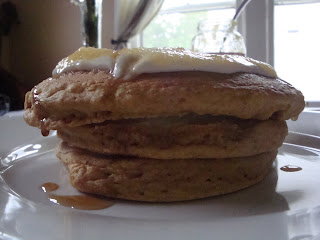
Pumpkin Pancakes


This seems a bit out of season, but I could no longer ignore the can of pureed pumpkin staring at me that I bought on sale this winter. We had to have pumpkin pancakes. I usually use a pureed squash for any pumpkin-flavored food - bread, pancakes, muffins - since Driftless Organics does a wonderful job of stocking us up on squash in the fall. If you've got that random can of pumpkin or frozen pureed squash here's the recipe for you! Or hold off until the fall for this awesome breakfast...or lunch or dinner.

This recipe is largely inspired by Robin Robertson's Pumpkin Pie Pancakes in Vegan Planet. I enjoy many of her pancake recipes; however, they are a bit too thick and heavy and don't yield enough for my family. Here's my version inspired by Robin.

DRY INGREDIENTS:
1 1/2 cups whole wheat flour
1 1/2 cups unbleached all-purpose flour
1/4 cup sugar
2 Tablespoons baking powder
1 teaspoon salt
1/4 teaspoon cinnamon
1/8 teaspoon nutmeg
1/8 teaspoon ground ginger
pinch of ground cloves

WET INGREDIENTS:
2 cups unsweetened soy milk
1/2 cup water
1 scant cup pumpkin puree (half of a 15 oz can - use the other half for pumpkin bread or next week's pancakes!)
1/8 cup canola oil
1/4 cup water (gradually added at the end of mixing)

Gently combine dry ingredients in large mixing bowl. In a blender, combine soy milk, 1/2 cup water, pumpkin puree, and canola oil. Make a well in the dry ingredients and add wet mixture. Stir until just combined. Add additional water until you get your preferred pancake consistency. We like it to slowly yet easily fall off the spoon.

Start the heat under your griddle at medium heat. Brush a light amount of canola oil or Earth Balance over the griddle. Begin to ladle your cakes onto the griddle. Flip when batter begins to bubble. I let mine bubble a minute or so. I like slightly brown cakes. I make baby cakes that are roughly 2 1/2 inches in diameter and regular cakes that are roughly 4 inches in diameter. This yields about 10 regular cakes and five baby cakes. Just enough for this ravenous family of four.

To serve...spoon a layer of whole-milk yogurt or soy yogurt then a layer of applesauce. Top with another pancake and repeat until you've reached a tower of pancakes that can fit in your mouth. Drizzle the top with just a bit of pure maple syrup. Pure awesomeness.

For the kids...spoon yogurt and applesauce on their pancakes, too, or just spoon a dollop of each on their plate for dipping.

Tuesday, July 7, 2009

Summer Squash and Rainbow Chard Za

(partially devoured za)

I have long feared making anything that involves active yeast. The first few times I tried, I failed. I was unsure how to "test" the yeast. How warm should the water be? How big should the dough be when it rises? How do I correctly knead? Well...thanks to one of my most dearest friends, Sara, I have begun to overcome this fear.

About a month or so ago, Sara came over and gave me a pizza dough tutorial. I'm a hands-on learner, and it was so wonderful to see Sara step me through everything. We made two pizza doughs, and they were awesome. Last week, I did it myself for the first time, and I actually succeeded. Yea!

Thursday is our CSA pick-up day. My kitchen is pretty bare on Thursday as I await to see what I'll have to work with for the week from my box. I decided that homemade pizza was the best meal to make. I could easily whip up some dough and homemade marinara sauce in the afternoon then use whatever veggies were presented to me that early evening by Driftless Organics. It was a fantastic meal. Thursday may now become our weekly pizza night.

INGREDIENTS:
One half batch of All-Purpose Pizza Dough (from Ken Haedrich's Feeding the Healthy Vegetarian Family)
3/4 to 1 cup of Easy Marinara Sauce (from Cathe Olson's The Vegetarian Mother's Cookbook)
*Either of these above recipes could be easily replaced by another recipe, but these are my two all-time fave cookbooks.
One medium-sized yellow summer squash, haphazardly peeled to remove prickly skin then thinly sliced into half-moons
One bunch rainbow chard, rinsed and roughly chopped
Handful of shredded mozzarella (optional)
*I buy one block of mozzarella then shred it in my food processor. Since I use so very little cheese on our pizza, I freeze most of it. I then break off a chunk each time I make a pizza. Frozen shredded cheese lasts up to six weeks, I believe, according to Betty.
Salt and Pepper, to taste

Heat some olive oil in a saute pan. Add summer squash and cook until tender then add chard and salt and pepper to taste. Cover and steam until all is tender but not overcooked...about 5 minutes.

Meanwhile, roll out dough and place on a cookie sheet. I like to bake my pizza on a Silpat. It's more idiot-proof for me. Spread sauce evenly on dough. Add veggies. Sprinkle with cheese. Bake in oven at 400 for 20-25 minutes.

All members of my family loved this. The 12 month-old devours it almost as fast as his father.

Enjoy!

Wednesday, July 1, 2009

Watermelon

This time of year my family consumes at least one good-sized watermelon a week. We could probably double that, but I limit myself to one each week at the co-op to practice some good ol' self-control. Watermelon often serves as our dessert at lunch and dinner. I love all the water content, and feel assured that my one-year-old is getting an extra dose of water while he's mastering his drinking skills.

Sometimes I think watermelon is avoided, because it's seems like a big mess. I believe I learned our technique of cutting and storing watermelon from my husband. There is never a mess, and it's a one-time process for a whole week of tasty watermelon.

Step 1 -- We never cut watermelon on a cutting board. The juice oozes everywhere and the kitchen gets nasty sticky. Rinse the outside of the watermelon in the sink and proceed to do all the cutting in the sink. Cut the watermelon into quarters.

Step 2- Take your first quarter and create a grid of bite-size pieces.


Step 3 - Empty the inner pieces into a bowl.


Step 4 - Cut along the rind to empty the remaining pieces into the same bowl.

Step 5 - Repeat with the three remaining quarters of the watermelon. Store in storage containers in the fridge and feast for days!